- Shop Now
- Burncoose Specialities
- This Month
- Offers & Promotions
- RHS Chelsea Flower Show 2024
- 40 years at Burncoose
- Engage With Us
- Information, Help & Advice
- About Us & Our Services
- Terms & Conditions
- Log In / Register
Chapters
Hosta - Care Guide
Caring for Hosta – Plantain Lily
Hostas are another of those common garden perennials whose new forms and varieties have been bred and developed at a great pace in recent years. The number of new introductions with intricate and colourful leaf forms in their clumps is hard to keep up with. All manner of leaf variegation, both whites and yellows, has been created in new varieties where this variegation is wide or narrow margined or in the centre of the leaves; sometimes both. It is difficult to know which of the new forms to recommend as not everyone likes variegation on leaves and others look more to hosta flowers in their gardens rather than just the attractive leaves.
Hostas have all manner of different uses in the garden. They can be used simply as groundcover where they will certainly inhibit weeds in darker, shady, moist corners of the garden. They make wonderful feature plants in borders but are useful too in a woodland setting; in boggy areas or by streams. Here the taller growing and more bulky H. sieboldiana varieties may be best. Smaller growing and more dense varieties can be used to edge a border or rockery. Hostas also sit well in pots or underplanted in containers above a standard grown fuchsia or something similar.
Whenever one mentions the word ‘hosta’ the immediate response is very often ‘oh, but my slug problem is terrible’. It is undeniably true that slugs and snails do love hosta leaves and can leave them covered in unsightly slimy holes. The use of slug bait as the leaves emerge is probably a given unless you prefer more natural means of control. Large slugs and snails which often live in wall crevices can often be spotted in early mornings devouring your hosta leaves. You can pick them off and leave them on the lawn for the thrushes to consume or deal with them in other ways. Provided your hosta clumps are in full sun and away from damp walls or corners the slug problem may affect the odd leaf, but the damage is usually slight in the context of the sheer number of leaves on a mature plant. In damper locations the problem may be worse and you may consider using a sharp gravel mulch around the crown of the plant to deter slugs from the emerging leaves. Vigilance in wetter conditions and just a little bit of checking in drier ones can contain the problem most of the time.
Hostas flower best in full sun and less well in shade although H. sieboldiana varieties can often surprise you in the darkest corners. Hosta flowers are nearly all white, creamy-white or mauve on long stalks of varying heights above the leaves in May through to July depending on the variety.
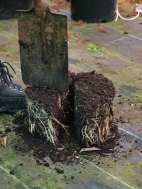
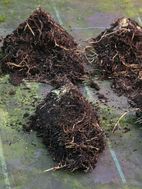
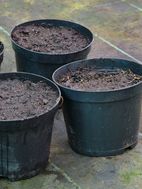
Rather like hemerocallis, established hosta clumps eventually get thick and dense and start to rise up out of the ground. These large clumps can readily be lifted when dormant with a spade or fork in late autumn or in the spring and offsets or side shoots chopped off with a spade, axe or sharp knife to produce smaller growing clumps. If you aim to create offsets with two or three new leaf spikes these are ideal for transplanting or giving away to friends. Divisions from newer varieties of hosta may have some genuine value. In doing this splitting, and then returning the core of the clump back into position, you also have the chance to fertilise and improve the ground by digging in dung or leaf mould (peat if you prefer) to encourage larger leaf growth and more flowering than you would have had previously.
If you do grow hostas in hot dry conditions winter mulching will certainly help conserve moisture in the surrounding soil later in the year. Yellow leaved hostas need to be in full sun to keep their leaf colour which will fade in shade.
Hostas are extremely easy to grow and multiply in all sorts of different gardens. Do not bother trying to grow them from seed as older varieties will have had multiple pollinations from other nearby garden plants of different varieties. Most of the very new hosta varieties are propagated for you from tissue culture anyway and not by seeds. Division is so much easier!
Do not let the fear of slugs put you off trying some of the impressive new leaf colours in the new hostas which we now offer.
At the end of the season they will need tidying up.
Dividing Hostas
Favourite Hosta pictures
Further Reading
Further reading and images in the Caerhays Garden Diary - Hostas.
Slug protection - Video Tip
Plants
- HOSTA
- HOSTA 'Chain Lightning'
- HOSTA 'Fire and Ice'
- HOSTA 'Francee'
- HOSTA 'Golden Tiara'
- HOSTA 'Guacamole'
- HOSTA 'Halcyon'
- HOSTA 'Honeybells'
- HOSTA 'Liberty'
- HOSTA 'Minuteman'
- HOSTA 'Orange Marmalade'
- HOSTA 'Purple Heart'
- HOSTA 'Stained Glass'
- HOSTA 'Sum and Substance'
- HOSTA fortunei albopicta
- HOSTA sieboldiana
- HOSTA tokudama 'Blue Cadet'


